How to Set up and Use a Dial-Gauge Pressure Canner
So, you've got yourself a pressure canner and it's time to start preserving some food. But maybe you've never done this before or it's just been a really long time. Or perhaps, you've never used this style of pressure canner.
Just as a bit of background, there are 2 primary types of home canning:
Water bath canning &
pressure canning.
Water bath canning can be a great way to preserve some foods, but low acid foods such as vegetables, meats, poultry and seafood require special handling to prevent spoilage from the bacteria that can cause Botulism.
That special handling is what we refer to as pressure canning. In fact, when we add steam to the canning environment-- which is what we do in pressure canning-- we effectively raise the temperature inside the canner past the boiling point of water (which is 212° F / 100°C), up to as much as 250°F / 121°C. Prolonged exposure to higher temperatures is required to DESTROY the spores that cause Botulism.
Remember, when pressure canning:
- Use ONLY tested recipes
- Follow instructions CAREFULLY
- Stick to required processing times EXACTLY!
Materials Needed:
In this video we'll just be doing a 'practice run' with our pressure canner. You can do this, too. Or if you're really itching to can something today-- just go for it! Either way, we'll show you how to set up and get comfortable with using a dial-gauge pressure canner.Here's what you'll need to get started:
- Dial-gauge pressure canning setup
- Stovetop canner
- Cooking rack
- Jar lifter
- 4-6 pint jars filled with water only (or jars filled with whatever you've prepared, following a tested recipe)
- Lids for your jars (new)
- Rings for your jars
Setting Up:
- Read through the manual for your pressure canner and familiarize yourself with all the parts and pieces. Make sure you're not missing anything before you start.
- Make sure the overpressure plug and the dial gauge are both in place on the lid.
- Also make sure the rubber gasket is tucked in the groove on the underside of the lid.
- If the gasket is dry or it's been awhile since you've used the canner, you can rub the gasket with a little cooking oil to ensure it stays pliable and provides a good seal.
Start Canning:
- Add 3 quarts of water to the canner. You do not want to cover the jars in water, like you would in a water bath canner.
- Place the cooking rack on the bottom of the canner. You never want your jars to touch the bottom of the canner.
- Place your jars-- either filled with water or filled with the food you've prepared following a tested recipe-- on the canning rack, using a jar lifter.
- Check the vent pipe on the lid by holding it up to the light and making sure you can see right through it. It's VERY important that air can escape through this pipe.
- Find the arrows or 'v' marked on the lid and on the handles of the canner body. Line them up, press down slightly and then twist the lid so the handles on the lid are lined up with the handles on the pot. You should feel a little resistance, which indicates there's a good seal.
- Place the canner on a burner on the stove (either gas or electric) and turn it to a fairly high heat. Let it start to boil and keep an eye on it. After a few minutes, you should start to see a steady flow of steam coming from the vent pipe.
- Once the steady flow of steam has begun, set a timer for 10 minutes. This will exhaust the steam from the canner.
- When 10 minutes has elapsed, VERY CAREFULLY place the pressure regulator on top of the vent pipe. You may want to use a glove or a hot pad to do this.
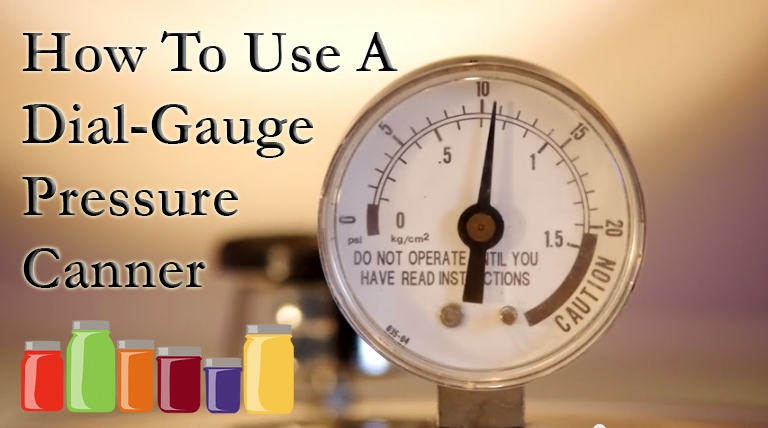
- Once you've placed the pressure regulator on the vent pipe, you'll see the dial on the gauge begin to rise. The cover lock in the air vent will also rise, indicating there is pressure inside the canner.
- Now you'll let the gauge start rising to the required pressure, as indicated in your recipe. When your pressure gets close to the amount of pressure you need, you'll want to start controlling the heat in order to keep your pressure steady at the target psi.
- It's okay for your pressure to get a little higher than what's called for in your recipe, but it must NEVER DROP BELOW that amount.
- If the pressure does drop below the amount required, you will need get it back to the required pressure and start your processing time all over.
- Once you've hit your target pressure AND as long as it never drops below that level, you can set a timer for the amount of processing time required in the recipe you're using.
- Make sure you monitor your canner the ENTIRE time it is processing.
- When the target time has been reached, turn off the heat and let your canner sit undisturbed. Let the pressure drop all the way to zero AND wait for the cover lock in the air vent to drop back down.
- Remove the pressure regulator from the air vent and let the canner sit for an additional 5-10 minutes.
- Then carefully rotate the canner lid the opposite direction from when you put it on and lift it towards you to ensure you are shielded from any residual steam.
- Remove the jars from the canner, using your jar lifter, and place them on a cloth or a wood cutting board to cool.
- Leave jars for several hours or overnight, until they're completely cool to the touch.
- Then, make sure the jars are sealed, remove the screw top bands and label and date them.
- Store your jars until you're ready to enjoy the 'fruits of your labor' or share them with friends and family.
- Enjoy!
Happy Canning!
Frequently Asked Questions and Quick Tips!
Never be afraid to ask!
- What should I do if the pressure in my canner goes over the pressure indicated in my recipe?
ANSWER: Don't worry if your pressure goes over the required amount. Just make sure you DON'T let it dip below the pressure required.
- What should I do if the pressure in my canner drops below what's required in my recipe?
ANSWER: All is not lost! You just need to get your pressure back up to the required psi and once it's holding steady, begin your processing time all over again. It's that easy.
- How often (how) should I get my gauge tested?
ANSWER:It's important to check and calibrate your gauge for accuracy at least once a year or if you accidentally drop it or submerge it in water. Call your county extension agent (find them here: http://npic.orst.edu/pest/countyext.htm). They will test it for you for free!
- What do I do if my vent pipe is blocked?
ANSWER: If you cannot see completely through the vent pipe when you hold the lid up to the light, no worries! Simply unbend a paper clip and insert it into the vent pipe to clear the obstruction.
Unless indicated otherwise, images, recipes, and other content are Copyright The Mason Jar Suite and Broken Banjo Enterprises. You may print and utilize this information for home and personal purposes. If you wish to republish this recipe, please link to this post or get in touch for other purposes.
Never be afraid to ask!
- What should I do if the pressure in my canner goes over the pressure indicated in my recipe?
- What should I do if the pressure in my canner drops below what's required in my recipe?
- How often (how) should I get my gauge tested?
- What do I do if my vent pipe is blocked?
ANSWER: Don't worry if your pressure goes over the required amount. Just make sure you DON'T let it dip below the pressure required.
ANSWER: All is not lost! You just need to get your pressure back up to the required psi and once it's holding steady, begin your processing time all over again. It's that easy.
ANSWER:It's important to check and calibrate your gauge for accuracy at least once a year or if you accidentally drop it or submerge it in water. Call your county extension agent (find them here: http://npic.orst.edu/pest/countyext.htm). They will test it for you for free!
ANSWER: If you cannot see completely through the vent pipe when you hold the lid up to the light, no worries! Simply unbend a paper clip and insert it into the vent pipe to clear the obstruction.